


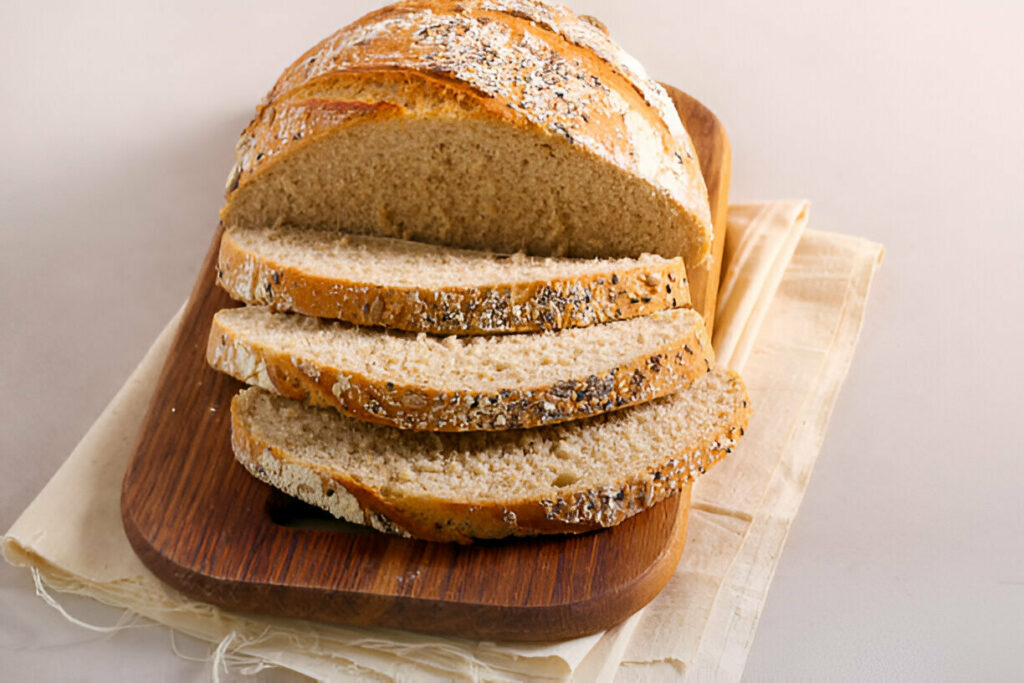
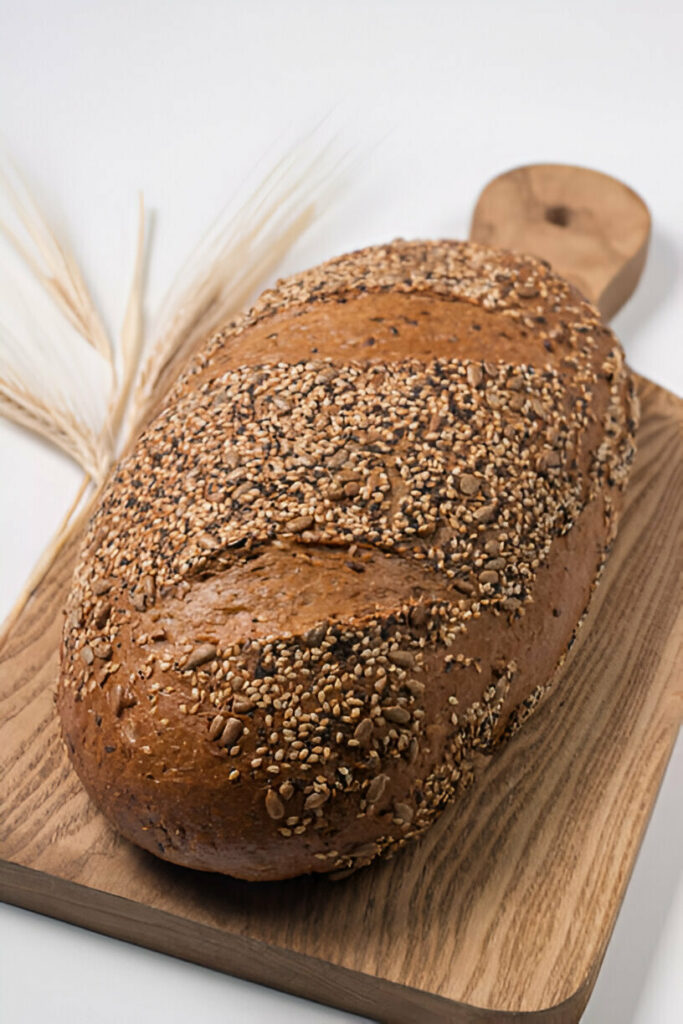
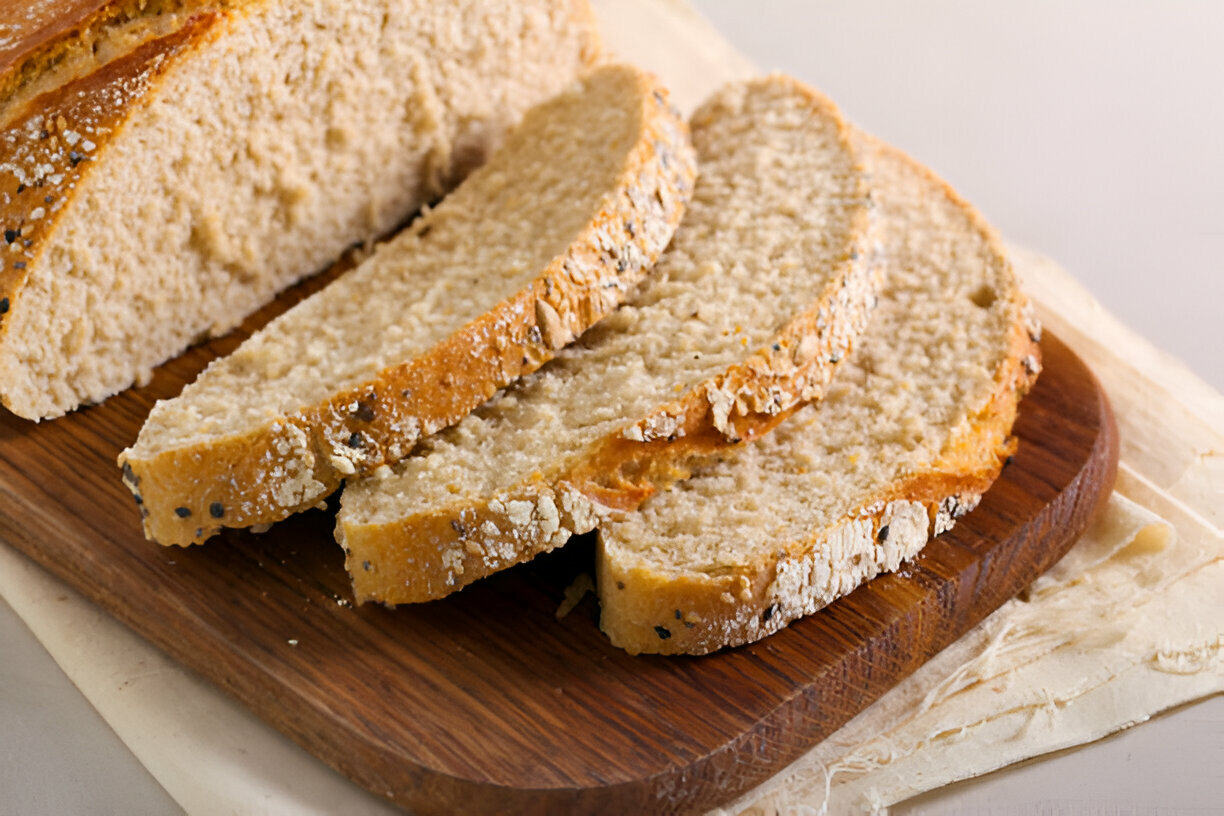
Sesame Wheat bread delivers a bold, nutty character packed into every hearty slice. With its tender crumb and deep, earthy flavors, it’s a loaf that speaks of warmth and home. The richness of whole grains, the crunch of sesame seeds, and the gentle tang of sourdough culture weave together into a rustic bread that’s both comforting and full of texture.

Ingredients Breakdown
To build the sturdy yet tender structure of this bread, bread flour and whole wheat flour work hand in hand. Bread flour lends strength and elasticity, essential for the bread’s rise and chew, while whole wheat flour contributes hearty flavor and a dense, satisfying crumb.
Honey adds a natural sweetness that not only enhances the flavor of the wheat but also promotes gentle caramelization during baking. Sesame seeds, unhulled and toasty, bring an unmistakable nuttiness that punctuates every bite with tiny bursts of flavor and texture.
A ripe sourdough starter is the engine that powers the dough’s rise and imparts a slight tang, balancing the sweet and nutty notes beautifully. Its activity level ensures a lively fermentation and a supple, well-structured dough.
Precision in measuring is vital here. Using a kitchen scale to weigh your ingredients guarantees consistency and accuracy, particularly critical when working with high-hydration doughs like this one.
Step-by-Step Preparation Guide
The journey begins by hydrating the flours, sourdough starter, salt, honey, sesame seeds, and warm water together. Mixing until no dry spots remain is essential; the dough should feel sticky and cohesive, setting the foundation for proper gluten development.
Mastering bowl folds is crucial to this bread’s texture. Instead of kneading aggressively, gentle folds at intervals allow the dough to strengthen and develop structure without losing its airiness. Each round of stretching and folding builds internal strength while preserving delicate bubbles that will later form the open crumb.
During bulk fermentation, watch for the dough to double in size and take on a marshmallow-like softness. This visual and tactile cue is far more reliable than the clock, especially given sourdough’s sensitivity to room temperature.
Shaping the dough into tight boules or bâtards requires a light touch and confident movements. Building tension across the surface without deflating the dough ensures the bread holds its shape during proofing and baking.
The seed crust technique starts with lightly dampening the shaped dough, then rolling it generously in sesame seeds. This not only adheres a beautiful, flavorful crust but also helps protect the bread’s surface during baking.
Final proofing allows the shaped loaves to relax and expand gently. When pressing a floured finger lightly into the dough leaves a soft impression without springing back too quickly, the bread is perfectly proofed and ready for the oven.
Baking with steam—created by adding water to a hot skillet—mimics a professional bakery’s conditions. It encourages the loaves to expand fully before the crust hardens, creating a glossy, richly caramelized shell that crackles when sliced.
Recipe Tips & Frequently Asked Questions
How to maintain the right dough temperature during bulk fermentation:
Place the dough in a slightly warm (but not hot) spot, aiming for an environment between 75°F and 78°F for ideal fermentation.
Why you should wet your hands when folding sourdough:
Damp hands prevent sticking and allow you to stretch the dough cleanly without tearing or deflating it.
How to avoid over-proofing after shaping:
Watch the dough closely during the final proof; a slight jiggle and a soft, slow rebound to a fingertip impression signal perfect readiness.
Tricks for maximizing oven spring and crust color:
Preheating the baking stone or steel thoroughly and creating strong initial steam are key to a dramatic rise and deep, crackling crust.
Can I substitute different types of seeds for the crust?
Yes, poppy seeds, sunflower seeds, or flaxseeds can add different flavors and textures to the crust.
What if I don’t have a baking stone or steel?
A heavy-duty baking sheet preheated in the oven can be used as a substitute, though results may vary slightly.
Can I adjust the hydration level of the dough for a softer crumb?
Reducing the water by about 5% will make the dough easier to handle and yield a slightly denser, more tender crumb.
How do I refresh frozen loaves to taste freshly baked?
Reheat frozen loaves in a preheated 350°F oven for about 10–15 minutes to revive the crust and warmth.
What to Serve With This Recipe
Sesame Wheat bread pairs beautifully with savory spreads like hummus, whipped feta, or olive tapenade. Its hearty profile and slight nuttiness complement bold, creamy toppings.
For breakfast, a toasted slice layered with avocado, a runny poached egg, or a slather of honey butter makes for a simple yet luxurious start to the day.
It also shines on a charcuterie board. Serve alongside cured meats, cheeses, olives, and roasted vegetables to create a rustic, satisfying spread that’s perfect for gatherings or casual entertaining.
Creative Variations
Swirling toasted nuts like walnuts or pecans into the dough adds an earthy richness that plays off the sesame seeds beautifully.
Introducing black sesame seeds into the crust or dough deepens the flavor, lending a slightly bittersweet note that’s irresistible.
For individual servings or special occasions, shape the dough into smaller rolls instead of large loaves, adjusting baking time accordingly.
Sesame Wheat bread is more than just a loaf—it’s a rewarding baking experience that brings the warmth and craft of artisanal bread-making into your own kitchen. From the first fold to the final slice, every step builds flavor, texture, and satisfaction, making it a project worth savoring and sharing.
Ingredients
Dough:
4 1/2 cups plus 2 tablespoons (558g) King Arthur Unbleached Bread Flour, plus extra for dusting
3 1/4 cups plus 1 tablespoon (372g) King Arthur Organic Whole Wheat Flour
3 1/4 cups plus 1 1/2 teaspoons (744g) Warm water (110°F)
1 tablespoon plus 1 teaspoon (23g) Table salt
1/2 cup plus 2 1/2 tablespoons (93g) Sesame seeds, unhulled
1 tablespoon (23g) Honey
Generous 3 tablespoons (47g) Ripe (fed) sourdough starter
Seed Crust:
3/4 cup (107g) Sesame seeds, unhulled
Instructions
Begin by accurately measuring the flours either by weighing or using the spoon-and-sweep method.
Day 1:
Start preparing the dough early in the morning. In a large mixing bowl, combine the ripe sourdough starter, bread flour, whole wheat flour, salt, honey, sesame seeds, and warm water. Mix until there are no visible dry patches. With moistened hands, lightly knead the dough by pressing it against the bowl’s side until it becomes slightly smoother and tacky to the touch.
Cover the dough and let it rest for 15 minutes. Perform a bowl fold by using wet hands to lift a section of the dough, stretch it up, and fold it back into the center. Rotate the bowl and repeat this stretch-and-fold motion 8 to 12 times until the dough offers resistance.
Cover again and rest for another 15 minutes. Conduct a second bowl fold, but this time only stretch 6 to 8 times until the dough tightens and resists further stretching.
After another 15-minute rest, perform a third bowl fold. Rest once more for 15 minutes and then proceed with the fourth and final bowl fold, folding until the dough resists.
Flip the dough so that the smooth side is facing upward. Cup your hand around the dough, gently tightening it by pulling towards the bottom to build surface tension. Transfer the dough into a large, preferably clear container. Mark the starting height of the dough on the container to monitor its rise.
Cover the dough and allow it to ferment at room temperature for 7 to 11 hours until it appears marshmallowy and doubles in volume. Keep an eye on its texture rather than strictly relying on time—warmer environments or active starters will shorten the rise time, while cooler temperatures may extend it.
Once fully risen, gently tip the dough onto a lightly floured work surface. Use a bench scraper or knife to divide the dough into two equal portions, approximately 930g each.
Pat each piece gently to expel any large air pockets, then preshape into a round shape. Cover the rounds and allow them to relax for 15 minutes.
Shape each dough ball into a boule or bâtard. Lightly dust two 9″ x 3″ round or oval bannetons with flour—using less flour than usual due to the seed crust.
Scatter the sesame seeds for the crust onto a rimmed baking sheet or a sheet of parchment paper. Dampen a clean kitchen towel thoroughly, then wring it out until damp but not dripping. Roll each shaped loaf lightly over the towel to moisten the surface, then roll it through the sesame seeds to coat the top and sides thoroughly.
Place the seeded loaves seam-side up into the prepared bannetons. If the dough doubled within 7 to 8 hours during bulk fermentation, transfer the loaves directly to the refrigerator for a slow proof. If bulk fermentation took closer to 11 hours, let the loaves rise at room temperature for 1 additional hour before chilling. At the end of this slow final rise, the dough should feel light and a gentle fingerprint should leave an impression without springing back immediately.
Day 2:
Preheat your oven to 475°F. Position a baking stone or steel on the middle rack and place an empty cast iron skillet or a tray filled with lava rocks on the rack beneath it. For optimal steam circulation, try to arrange the stone and skillet so the skillet isn’t directly underneath the stone.
Invert the loaves carefully onto parchment paper. Using a baker’s lame or a sharp razor, score the tops of the loaves with clean, confident slashes.
Load the loaves into the oven, still on the parchment, placing them side-by-side on the baking stone or steel. Immediately pour about 1 cup (227g) of warm water into the hot skillet to generate a burst of steam.
Bake the loaves at 475°F for 25 minutes. Then lower the oven temperature to 450°F and continue baking for another 20 minutes, or until the loaves are richly browned and the crust feels firm to the tap.
Remove the loaves from the oven and allow them to cool completely on a wire rack before slicing.
Storage Information:
Store the cooled loaves at room temperature, lightly wrapped in a cloth or paper bag for up to two days. For longer storage, freeze the loaves and reheat when needed to restore freshness.
Sesame Wheat Recipe
Ingredients
Dough:
- 4 1/2 cups plus 2 tablespoons 558g King Arthur Unbleached Bread Flour, plus extra for dusting
- 3 1/4 cups plus 1 tablespoon 372g King Arthur Organic Whole Wheat Flour
- 3 1/4 cups plus 1 1/2 teaspoons 744g Warm water (110°F)
- 1 tablespoon plus 1 teaspoon 23g Table salt
- 1/2 cup plus 2 1/2 tablespoons 93g Sesame seeds, unhulled
- 1 tablespoon 23g Honey
- Generous 3 tablespoons 47g Ripe (fed) sourdough starter
Seed Crust:
- 3/4 cup 107g Sesame seeds, unhulled
Instructions
- Begin by accurately measuring the flours either by weighing or using the spoon-and-sweep method.
Day 1:
- Start preparing the dough early in the morning. In a large mixing bowl, combine the ripe sourdough starter, bread flour, whole wheat flour, salt, honey, sesame seeds, and warm water. Mix until there are no visible dry patches. With moistened hands, lightly knead the dough by pressing it against the bowl’s side until it becomes slightly smoother and tacky to the touch.
- Cover the dough and let it rest for 15 minutes. Perform a bowl fold by using wet hands to lift a section of the dough, stretch it up, and fold it back into the center. Rotate the bowl and repeat this stretch-and-fold motion 8 to 12 times until the dough offers resistance.
- Cover again and rest for another 15 minutes. Conduct a second bowl fold, but this time only stretch 6 to 8 times until the dough tightens and resists further stretching.
- After another 15-minute rest, perform a third bowl fold. Rest once more for 15 minutes and then proceed with the fourth and final bowl fold, folding until the dough resists.
- Flip the dough so that the smooth side is facing upward. Cup your hand around the dough, gently tightening it by pulling towards the bottom to build surface tension. Transfer the dough into a large, preferably clear container. Mark the starting height of the dough on the container to monitor its rise.
- Cover the dough and allow it to ferment at room temperature for 7 to 11 hours until it appears marshmallowy and doubles in volume. Keep an eye on its texture rather than strictly relying on time—warmer environments or active starters will shorten the rise time, while cooler temperatures may extend it.
- Once fully risen, gently tip the dough onto a lightly floured work surface. Use a bench scraper or knife to divide the dough into two equal portions, approximately 930g each.
- Pat each piece gently to expel any large air pockets, then preshape into a round shape. Cover the rounds and allow them to relax for 15 minutes.
- Shape each dough ball into a boule or bâtard. Lightly dust two 9″ x 3″ round or oval bannetons with flour—using less flour than usual due to the seed crust.
- Scatter the sesame seeds for the crust onto a rimmed baking sheet or a sheet of parchment paper. Dampen a clean kitchen towel thoroughly, then wring it out until damp but not dripping. Roll each shaped loaf lightly over the towel to moisten the surface, then roll it through the sesame seeds to coat the top and sides thoroughly.
- Place the seeded loaves seam-side up into the prepared bannetons. If the dough doubled within 7 to 8 hours during bulk fermentation, transfer the loaves directly to the refrigerator for a slow proof. If bulk fermentation took closer to 11 hours, let the loaves rise at room temperature for 1 additional hour before chilling. At the end of this slow final rise, the dough should feel light and a gentle fingerprint should leave an impression without springing back immediately.
Day 2:
- Preheat your oven to 475°F. Position a baking stone or steel on the middle rack and place an empty cast iron skillet or a tray filled with lava rocks on the rack beneath it. For optimal steam circulation, try to arrange the stone and skillet so the skillet isn’t directly underneath the stone.
- Invert the loaves carefully onto parchment paper. Using a baker’s lame or a sharp razor, score the tops of the loaves with clean, confident slashes.
- Load the loaves into the oven, still on the parchment, placing them side-by-side on the baking stone or steel. Immediately pour about 1 cup (227g) of warm water into the hot skillet to generate a burst of steam.
- Bake the loaves at 475°F for 25 minutes. Then lower the oven temperature to 450°F and continue baking for another 20 minutes, or until the loaves are richly browned and the crust feels firm to the tap.
- Remove the loaves from the oven and allow them to cool completely on a wire rack before slicing.
Storage Information:
- Store the cooled loaves at room temperature, lightly wrapped in a cloth or paper bag for up to two days. For longer storage, freeze the loaves and reheat when needed to restore freshness.